Summer... on the coast

  • Blog
  • About
  • Contact
This is a stock photo from Unsplash

This is a stock photo from Unsplash

Lighting 201: Our Coastal Farmhouse Basics

October 29, 2020 by Summer Shemo in Home Design

Happy {a l m o s t} November, Y’all! 🦃


Now that we know about the different types of lighting, I wanted to share with you what we chose to do in our new build Coastal Farmhouse.

Every room (with the exception of our shared dining space and our laundry room) has recessed lighting using daylight LED bulbs that we put on dimmers which provides our general lighting and that is the theme throughout our home. In the bedrooms we did a central ceiling fan (‘cause it’s Florida) surrounded by four recessed lights. In our normal height ceilings we used the new LED retrofit recessed lights (they are all-in-one fixtures, not cans) but in our spaces with 25 foot ceilings we used the recessed can lighting which has changeable bulbs. This basic setup was what I had in my previous home and Matt really loved it so we continued it on in this home. It really has worked well for us. We definitely use decorative lighting in some places in our home, but this post is about the basics.

Since Matt has LOTS of feelings about lighting, I figured it would be good for him to weigh in on this week’s post. He is OBSESSED with dimmers. Read on for his reasoning:

This is a ceiling photo from the girl's’ bedroom

This is a ceiling photo from the girl's’ bedroom

Why dimmable lights?   

Everyone loves light, but with today’s new LEDs, sometimes LED light can be too much white light.  Our solution was to install dimmable lights throughout the house.  Summer installed dimmable lights in her first custom build, and I really thought that this was a great feature that we wanted to emulate in our current custom house.  The dimmable lights allow you to save energy and also “set the mood” to whatever event is occurring in the house.  For instance, if we have a project going on in the kitchen, we usually prefer a lot of light; but when we are having dinner, we prefer softer lighting.  In our bedroom, we usually keep the light at a higher brightness early in the evening, but right before bed, we like to turn the lighting down to correlate with our evening lamp lighting.  The ability to control the brightness in rooms highly enjoyable and functional.   

The only places we did not install dimmers were in the main lights in the utility room and in the garage.  The utility room has small light over the sink that I keep at a lower wattage when I want less light, and in the garage, I keep softer bulbs in the garage door opener, giving me another softer option instead of the LED bar lights that are installed on the ceiling.

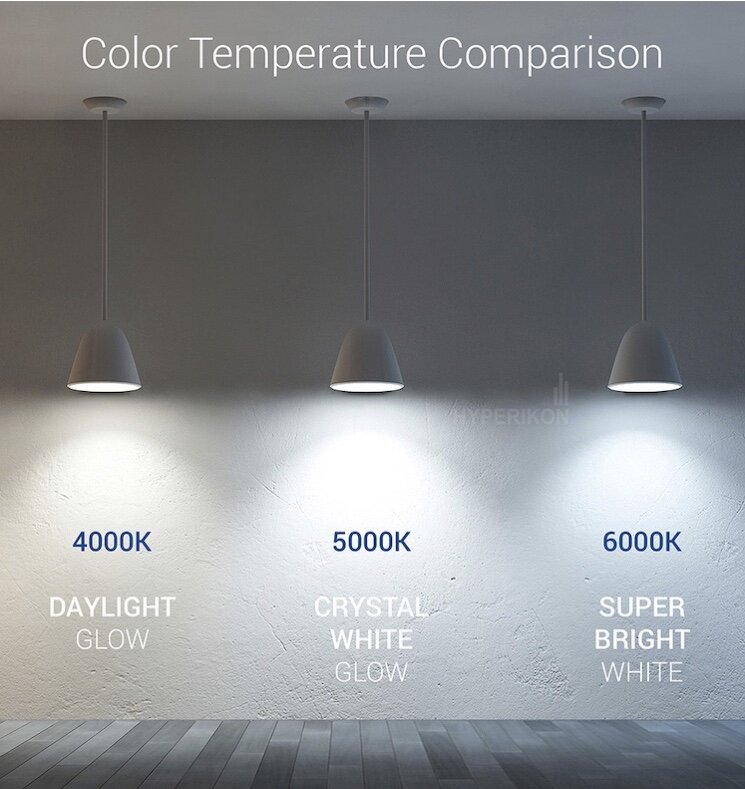
Why not just use softer yellow lights throughout the house? 

Well, on accident, our electricians actually installed the builder grade “yellow lighting” throughout the entire house.  Although we could still dim these lights, the yellow/orange color of these lights was simply not desirable throughout the interior of the house.  I had to go back and remove the 84 (YES, 84!!!!!!!) recessed yellow lights they installed, and then replace them with the more desirable white lights.  A lot of extra, unnecessary work, but we were happy with the final lighting.  

Are all yellow lights bad? 

We do still use some yellow, softer lighting on the exterior of the house, to include the porch and over the exterior of the garage doors.  We may play with this a little in the future, but we think it creates a better effect to not have full on white light lighting up the outside of the house.

I will link our ambient lighting fixtures and bulbs below. One additional thing: we have noticed that the retrofit fixtures only dim about 50%. We are kid of used to it now but it is not as nice as being able to dim the light 100%.

LED retrofit fixture

LED dimmable bulb

Lutron dimmer switch

I sure hope this info makes some sense and is helpful to you! Let me know if you have any questions!

have a blessed Friday!!!!

Adjustments.jpeg
October 29, 2020 /Summer Shemo
Home Design
This copper lantern in my favorite lighting fixture in our home— excited to share all about it soon! Follow me on Insta!

This copper lantern in my favorite lighting fixture in our home— excited to share all about it soon! Follow me on Insta!

Lighting 101: Let's Get Lit

October 20, 2020 by Summer Shemo in Home Design

What is the first thing you notice when you walk into a room? You might not even realize how much lighting affects what captures your attention. You can illuminate a whole room equally or choose to highlight a favorite piece of decor. My husband loves very dim “mood lighting” and I prefer things light and bright.

Photo courtesy of Pinterest

Photo courtesy of Pinterest

When I enter a new space I always pay attention to the illumination and check out the light fixtures. Lighting can convey SO many different things and you can totally develop a vibe just by playing around with lighting. In certain spaces the light fixtures can be considered part of the decor (I LOVE statement lighting 😍). In today’s blog post I am going to lay down the basics of home lighting then in upcoming posts I’ll share the lighting fixtures and specifics we have chosen in our new build.

First, there are four basic types of lighting you’ll want to consider for your home: general/ambient lighting, task lighting, accent lighting, and decorative lighting. It’s important to make sure you have utilize all four types to create balance and visual interest for your space. Ambient lighting comes from the room’s natural light (windows) plus the (typically) ceiling lights. It’s the primary source of light for a room. Task lighting is exactly what it sounds: illumination specific for a certain task. This can be desk lamps, a strategically placed pendant light over a kitchen workspace, etc. Accent lighting refers to illumination of an object or area in hopes of highlighting that item. For example, a fixture that provides lighting to a piece of art work or a light that showcases a special architectural design. Decorative lighting is a light fixture that brings attention to itself and adds character to a room, such as a chandelier. It is usually considered part of the decor.

Photo courtesy of Pinterest

Photo courtesy of Pinterest

Let’s talk about lumens. This is very important to know when choosing your bulbs. The higher the lumen, the brighter the bulb. Kelvin rating goes from 2700 to 6500 and varies from soft white to daylight. Soft white is 2700 to 3000 Kelvin and shows up as warm and yellow. This is a typical incandescent bulb color; often used in living rooms, dens, and bedrooms. Warm white is 3000 to 4000 Kelvin and is more yellowish-white and often used in kitchens and bathroom. Bright white is 4000 to 5000 Kelvin which gives off a stark white to blueish tone which typically feels less cozy and is often used for offices and garages. Daylight 5000 to 6000 Kelvin is more bluish and will allow you to see the most color in a room. Typically used for makeup mirrors.

Photo courtesy of Pinterest

Photo courtesy of Pinterest

We look best in warm white because it softens skin tone, reduces imperfections, and is more relaxing for the eyes. Basically, cool white for work spaces and warm white for living spaces is usually recommended.

The video I created below demonstrates how two different color temperatures look in our navy shiplap powder bathroom. (Side note: we didn’t intend to have different Kelvin bulbs but we just haven’t switched them yet). See my earlier blog if you are interesting in doing your own DIY shiplap!

I hope this basic lighting information is helpful to you as you plan your space! Thanks so much for being here!

Sources for this post include: contechlighting.com, cnet.com, ledmontreal.com

God Bless,

Adjustments.jpeg

You can find me and follow our home journey on Instagram @summer_onthecoast

October 20, 2020 /Summer Shemo
lighting, new home, home building, home build, renovation
Home Design
1 Comment

Wunderwall Install

September 16, 2020 by Summer Shemo in Coastal Farmhouse, Home Design

Hi there! Welcome back ☺️ Our projects lately have been centering around Thomas’ room (BTW, Thomas is my 18 year old son who just started virtual college and currently lives upstairs 🧑🏼‍🦱) for the past couple of weeks so today’s update is highlighting another change we made up there: a feature wall! ✨

AFTER

AFTER

I love the look of vertical shiplap and we had originally discussed using mismatched boards and creating a vertical wall that mimicked the dilapidated “surf shack” look. You know, driftwood, gray-ish brown with casual vibes. 🏄🏼‍♂️ Anyway, Thomas and I spent time looking around town and realized we would not only have to purchase the boards, but we would then have to spend hours and hours staining them and gray washing them to get that textured and worn look. And then we’d spend hours cutting and nailing them to the wall. I got tired just thinking about it. 🥱 Instead, we opted to go for a similar look with a TON less work! 😁

Ok, if you’ve been here (visiting the blog or my Instagram) since last year then you might recall our precious experience with peel + stick wall paper. 🥴But guess what!?! This was TOTALLY different! 😳
Wunderwall is actually much thicker than the Target stuff we used in the polka dot bathroom, so we didn’t have any pieces get stuck together and didn’t have to throw any in the trash. 🎉 And because it is much higher quality the install process went much faster and smoother than before. 🎉 We chose to order our mural on the canvas paper so it actually has a texture to it and isn’t slick paper which makes it look much more realistic IMO.

Here are some words from the man, the myth, the person who actually does all of my projects (😅) 👩‍❤️‍👨

MATT:
After a very challenging experience (you can say that again, hunny 😬) with the thin Target wall covering, we were very pleased with how easily the Wunderwall installed.  Because of the thick material used by Wunderwall, it is much easier to accurately place and also push out air bubbles.  Overall, it was a great alternative to actual wood planking because it saved us tons of time but we get the same look!

BEFORE

BEFORE

Installation tips:

-Focus on making sure the first strip you install is straight and level.

- For each strip, try to work from the left side and gently push down on the middle of the strip.  This will allow you to really line up the left side which adjoins the previous piece, and you can basically focus on the right side last. 

 - Use the provided tape aligners.  I thought that they really helped to keep everything level.  

From Summer: Dave at Wunderwall is so wonderful to work with! If you order a mural let me know because I’d love to see your project! 👀 And tell Dave I sent you! 👋🏼

I can’t wait to add some decoration to this wall! I am planning to do some floating shelves and a surfboard/skimboard/wakeboard situation… so I’ll definitely update to my Insta stories and here on the blog when we finish that.

Click Here to find me on Instagram!

Stay dry friends!

Adjustments.jpeg


September 16, 2020 /Summer Shemo
wunderwall, wallpaper, shiplap, vertical shiplap, bedroom
Coastal Farmhouse, Home Design
1 Comment
  • Newer
  • Older

Powered by Squarespace